Why SDD Took Off
In the second half of 2025, two hot projects appeared on GitHub almost simultaneously, both built around the same concept: SDD (Specification-Driven Development).
| Project | Stars | Creator | Created |
|---|---|---|---|
| spec-kit | 87,549 | GitHub (official) | 2025-08 |
| OpenSpec | 39,543 | Fission AI | 2025-08 |
SDD isn’t new—the concept dates back to around 2010, but it never caught on. What changed in 2025 is that AI coding assistants finally became usable enough. Specifications used to be written for humans; now they’re written so AI can understand requirements and generate code. That shift turned SDD from a nice-to-have methodology into a practical necessity.
How Development Methodologies Evolved
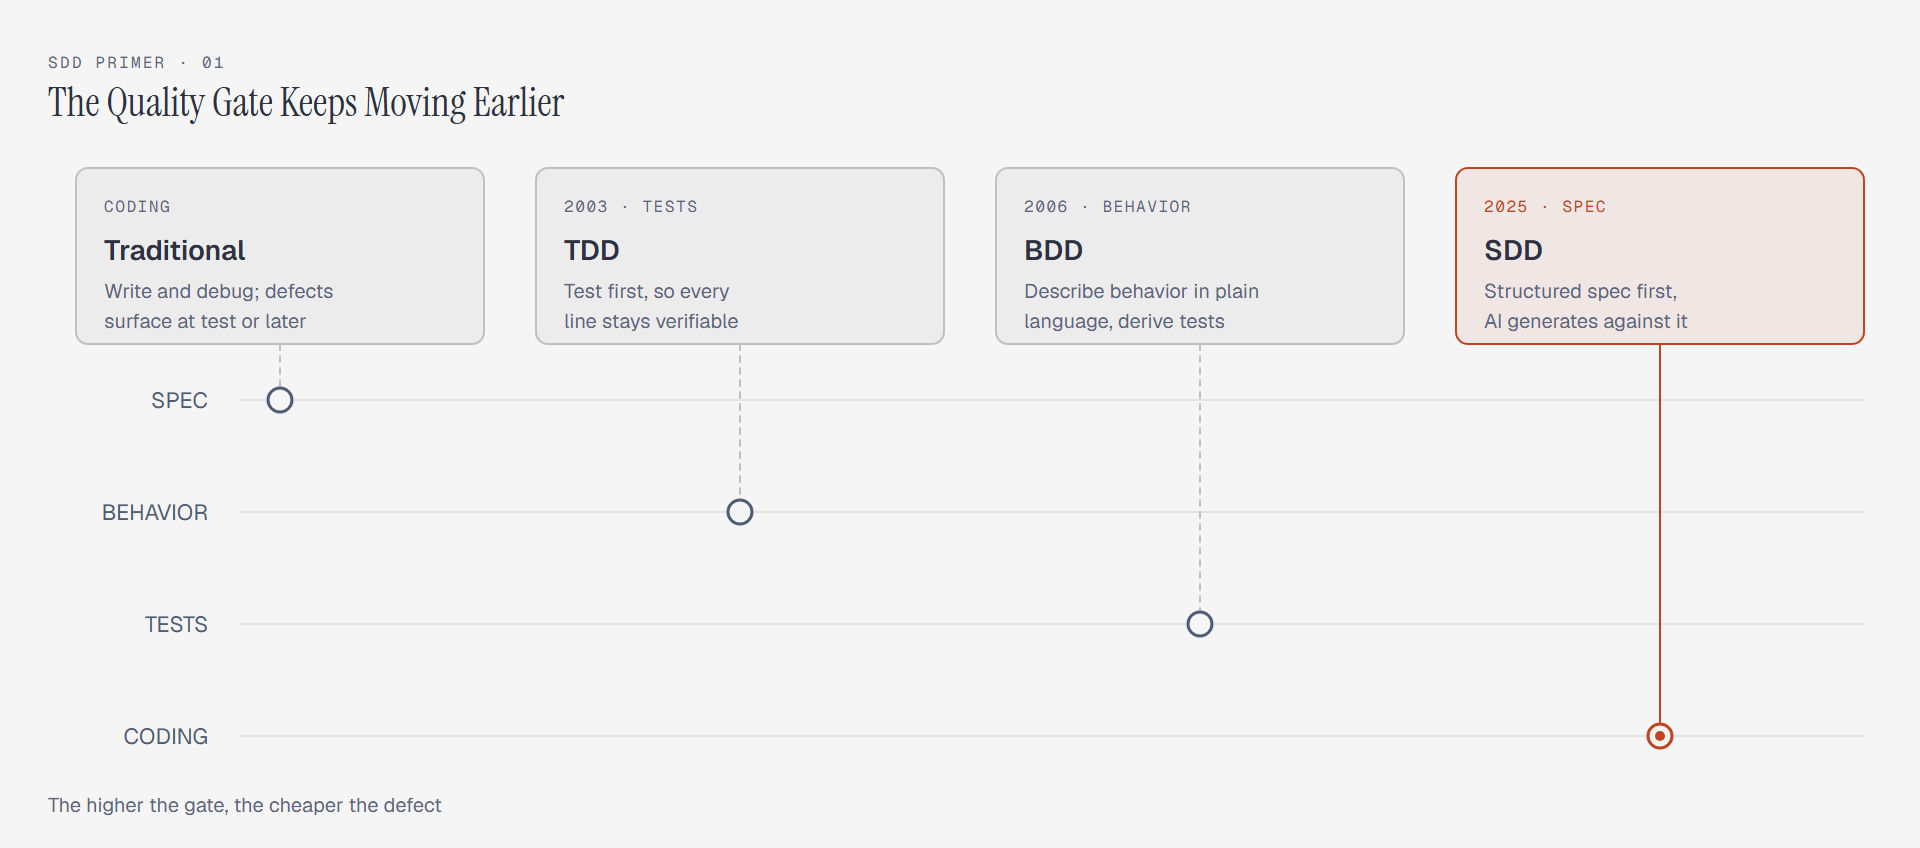
The evolution of software development methodologies has followed a consistent direction: pushing quality assurance earlier in the process. Traditional development flows through requirements, coding, testing, and deployment, with problems often surfacing only at the testing or deployment stage. TDD, proposed in 2003, moved the starting point to writing tests before code, ensuring testability. BDD, introduced in 2006, pushed further to behavioral descriptions defined in natural language. SDD moves the starting point to the specification level: define exactly what to build in a structured document first, then let AI generate code against that specification.
| Methodology | Starting Point | Core Idea |
|---|---|---|
| Traditional | Coding | Write and debug, problems surface during testing |
| TDD | Tests | Write test cases first, ensure verifiability |
| BDD | Behavior | Describe system behavior in natural language, derive tests and code |
| SDD | Specification | Write a complete specification, let AI generate code from it |
Why SDD Didn’t Catch On Before
SDD’s core premise—writing specifications before code—sounds logical. Three practical obstacles kept it from gaining adoption.
First, experienced developers write code faster than they write specs. Senior engineers have code templates ready in their heads; jumping straight into implementation beats documenting first. Second, specs drift out of sync with code. When code changes but the spec doesn’t get updated, the spec becomes decoration. Third, there was no tooling support. A Markdown file can’t execute, and there’s no way to verify whether code matches the specification.
AI coding tools gradually solved all three problems between 2024 and 2025. AI can generate code from specifications, adjust implementations when specifications change, and verify consistency between code and specs automatically.
Three Conditions for the SDD Explosion
| Condition | What Changed |
|---|---|
| Mature AI coding tools | Claude Code, Cursor, Copilot produce production-grade code |
| Developer role shift | From code writer to spec designer plus code reviewer |
| Complete toolchains | spec-kit and OpenSpec provide full execution frameworks for specs |
Industry forecasts project that by 2026, 80% of developers will use AI coding tools as standard practice, spending more time on specification design and architecture than on writing code itself.
What SDD Actually Is
SDD works by first describing what to build in a structured specification, then having AI generate code against that specification, and finally verifying the code matches the spec. Its core capabilities include:
| Capability | Description |
|---|---|
| Collaborative clarification | Developers often don’t fully understand their own requirements. AI helps define problems and explore solutions. This is SDD’s most underrated capability |
| Spec as contract | The specification is not a reference document; it’s a contract between human and machine. AI must implement strictly against it |
| Iteration-friendly | Specifications can be updated at any time, and AI adjusts code accordingly. Specs don’t become throwaway artifacts |
| Verification loop | Tools can verify whether code matches the spec and flag deviations automatically |
| Traceability | Every line of code traces back to a specific specification clause |
Collaborative Clarification: The Most Underrated Capability
Many people assume the SDD workflow is: developer writes a clear specification, then AI follows it. In practice, developers often don’t know exactly what they want. The traditional model assumes developers think everything through, write the spec, then hand it to AI for implementation. SDD’s clarification mode fits reality better: a developer has a vague idea, AI asks questions to sharpen it, both sides collaboratively define the problem and explore solutions, and the result becomes a specification for AI to implement.
Think of it this way. The traditional mode is like handing a restaurant chef a complete menu and asking them to cook it exactly. The clarification mode is like saying you want something light, then discussing with the chef whether soup or steamed dishes work, what you’re allergic to, and arriving at a menu together. Commands like /speckit.clarify and /opsx:explore exist for this reason: AI becomes an active requirements clarification partner, not a passive executor.
The clarification process itself is defining the problem. A surprising number of bugs trace back not to incorrect code, but to requirements that were never properly thought through.
Specification File Structure
The two tools lay out directories very differently, which is confusing at first. spec-kit organizes by feature, one numbered directory per feature. OpenSpec separates long-lived specs from short-lived changes: the main specs record how the system works today, and change specs record only what this change alters.
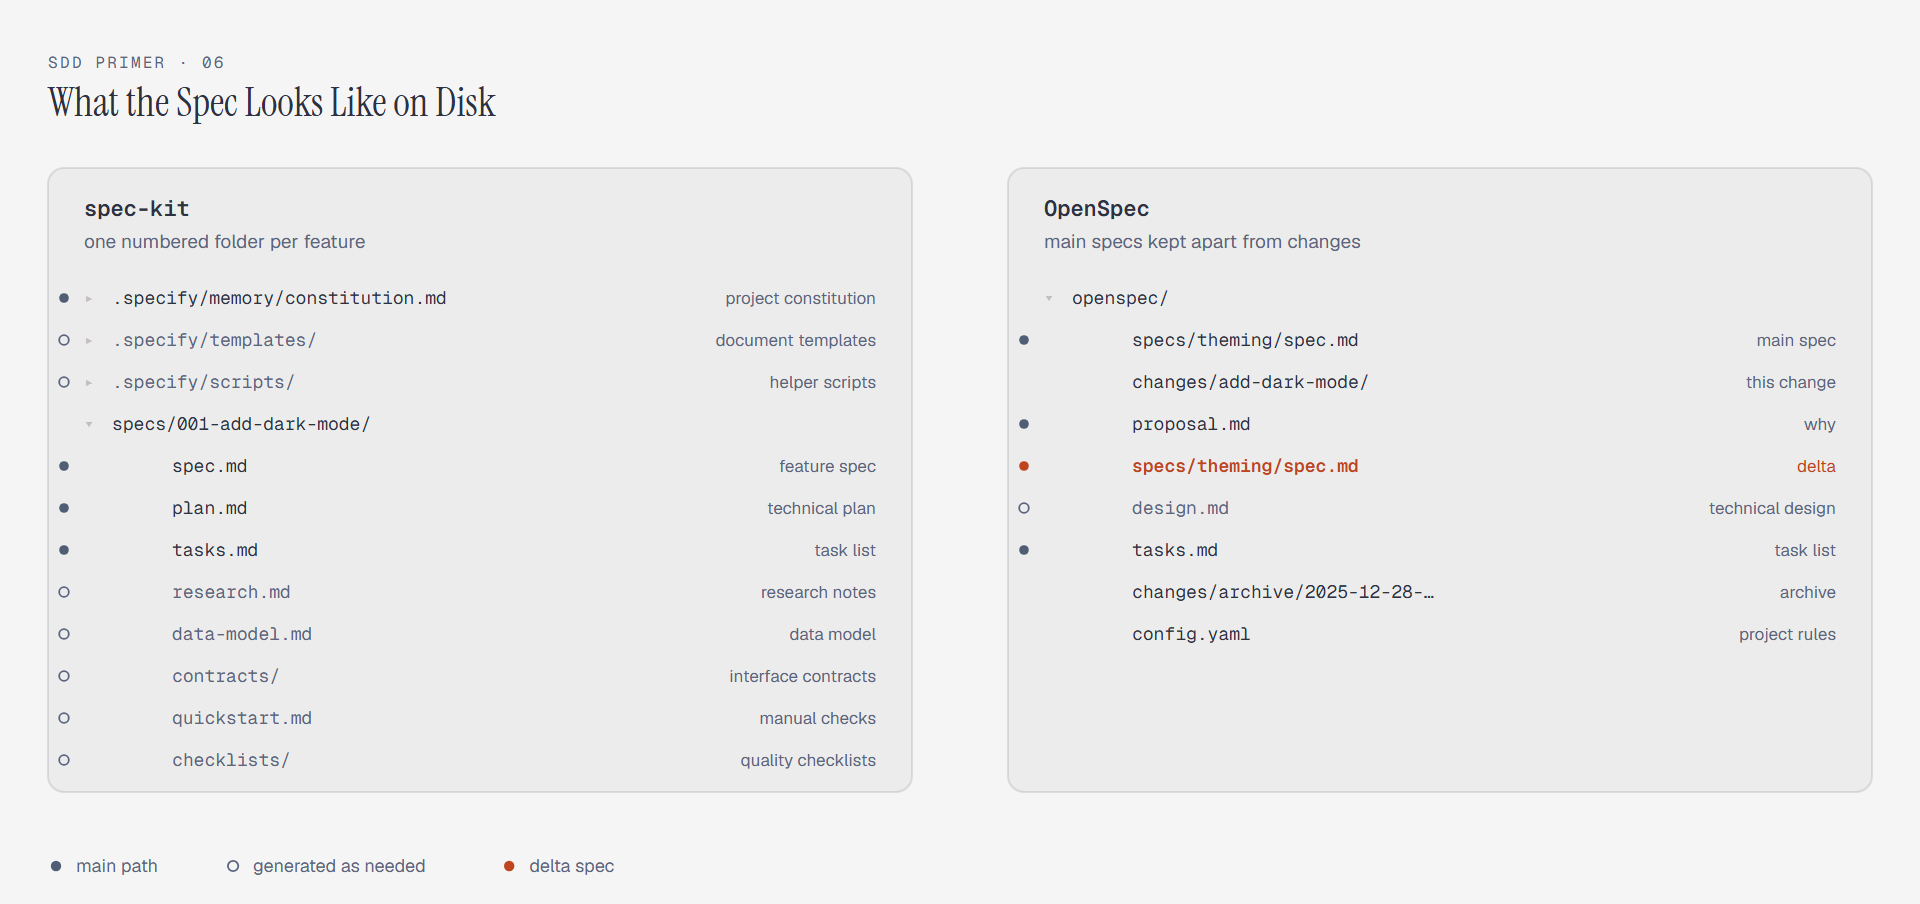
On the spec-kit side, spec.md, plan.md, and tasks.md are the backbone and get written for every feature. research.md and data-model.md appear only when there is a technical choice to research or entities to model, contracts/ only when there are external interfaces, and quickstart.md and checklists/ are optional. The number prefix is assigned automatically, and a git branch of the same name is created with it.
On the OpenSpec side, specs/ is the authoritative description of current behavior and changes/ holds work in flight. A change spec holds only the difference, never a restatement of the main spec, and marks the operation with four fixed sections: ## ADDED Requirements, ## MODIFIED Requirements, ## REMOVED Requirements, and ## RENAMED Requirements. Modified and removed entries must state the reason and the migration path, or the reasoning is lost at archive time. Every requirement carries at least one scenario written as #### Scenario: with WHEN/THEN, because the archive step parses exactly that structure when merging the delta into the main spec.
Archiving is OpenSpec’s most distinctive piece of design. When the work is done you run /opsx:archive, the change directory moves to changes/archive/, and the delta merges into openspec/specs/, so the main spec always equals the system’s real behavior. spec-kit has no such layer: its specs/001-add-dark-mode/ stays where it is, and history lives in git branches and directory numbers.
How SDD Relates to TDD and BDD
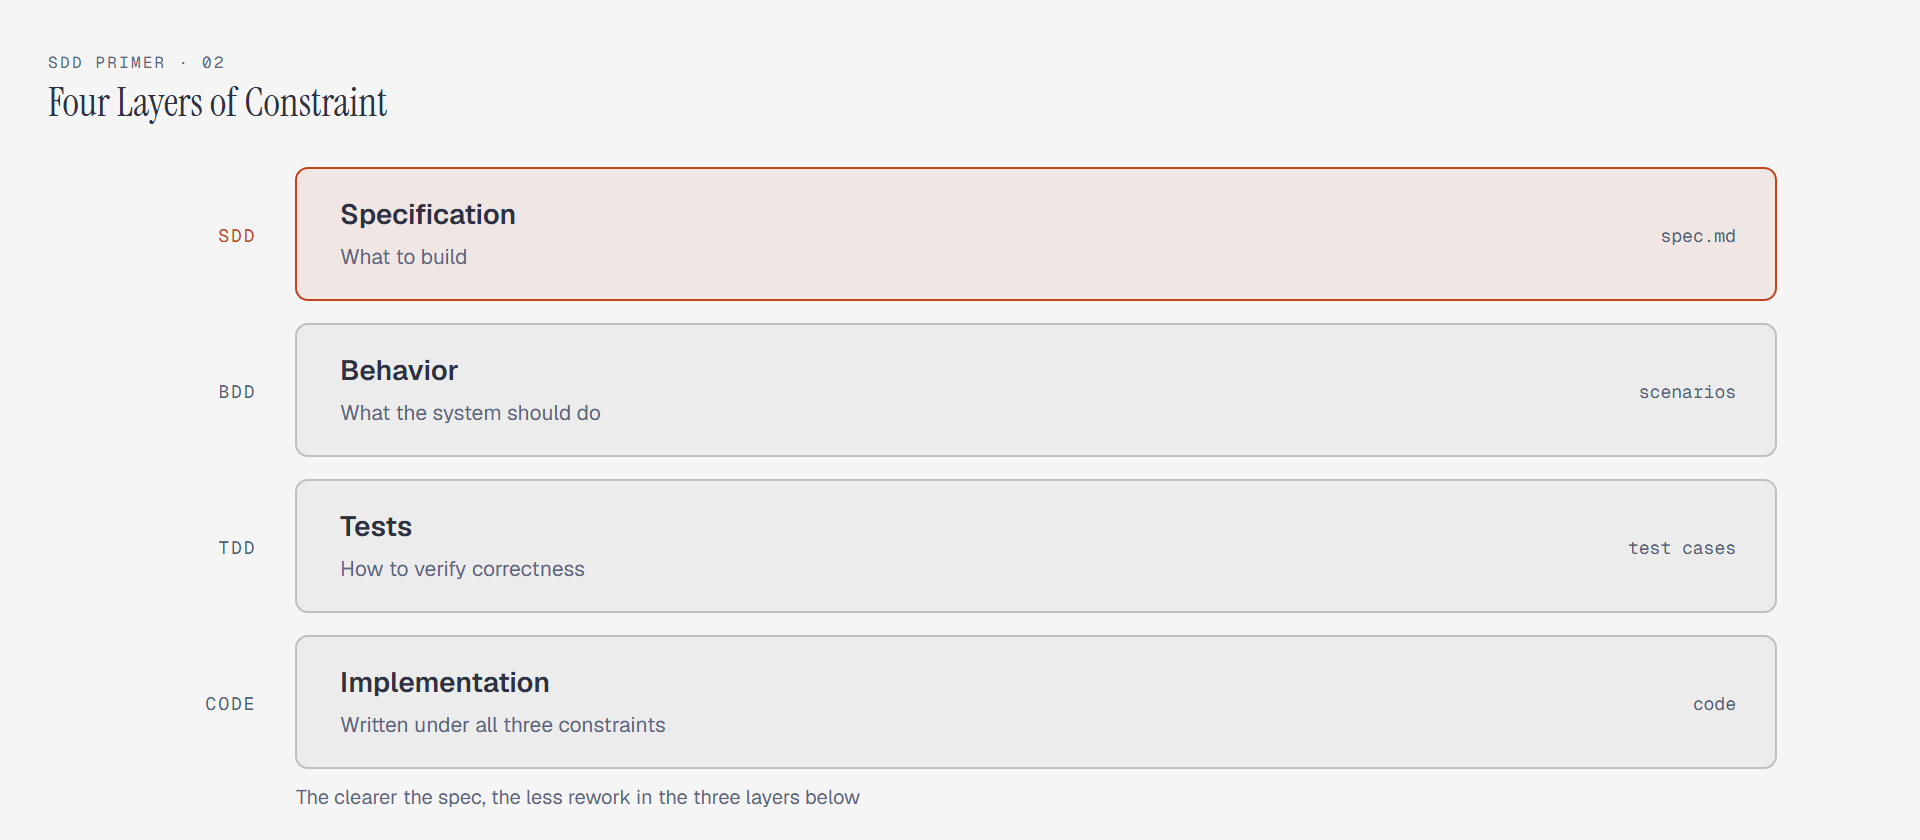
SDD doesn’t replace TDD and BDD; it adds a specification layer on top. SDD defines what to build at the top level, BDD defines what behaviors the system should exhibit at the middle level, TDD defines how to verify correctness at the bottom level, and the final code implementation is constrained by all three layers. AI doesn’t generate code freely; it operates within the triple constraint of specification, behavior, and tests.
| Layer | Focus | Question Answered |
|---|---|---|
| SDD | Specification | What to build |
| BDD | Behavior | What behaviors the system should have |
| TDD | Tests | How to verify correctness |
| Implementation | Code | AI generates under the above three constraints |
Workflow With and Without SDD
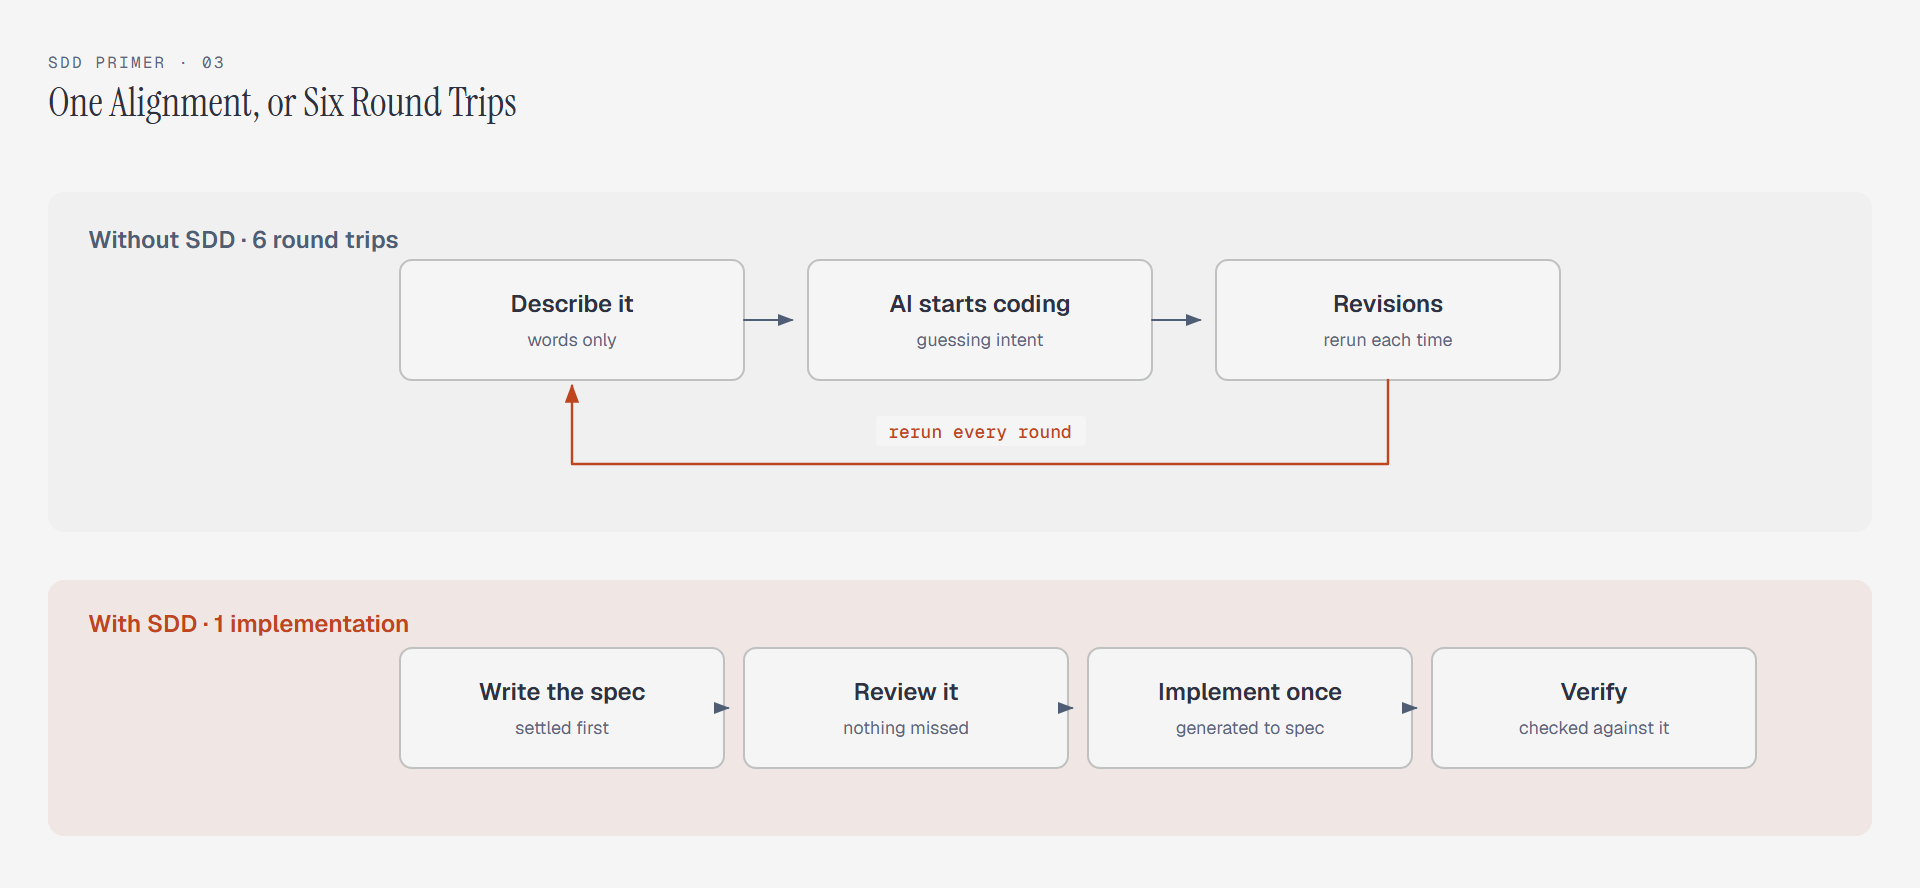
Without SDD, requirements and AI get refined through back-and-forth conversation, with constant revisions and low efficiency.
1 | You: Add dark mode |
With SDD, you align on what to build first, then implement in one pass, eliminating the revision overhead.
1 | You: /opsx:propose "Add dark mode" |
Supported Code Agents
| Code Agent | spec-kit Support | OpenSpec Support |
|---|---|---|
| Claude Code | --ai claude |
/opsx:* commands |
| Cursor | slash commands | slash commands |
| GitHub Copilot CLI | Native support | skills mode |
| Codex CLI | skills mode | skills mode |
| Windsurf | Supported | Supported |
The Clarification Mode
The workflows described above assume the developer knows what to build. Real work often involves vague requirements: wanting to add a comment feature to a blog but not knowing how to design it, or users complaining that search is slow without specifics about what’s slow. The clarification mode handles exactly these situations.
| Before Clarification | After Clarification |
|---|---|
| I want a comment feature (vague) | Comments require login, support nested replies up to 3 levels, editable and deletable, admin moderation required (clear) |
| Search is too slow (generic) | Homepage search API responds in 3s+, root cause is full-text search bypassing indexes, needs SQL optimization and caching (specific) |
| Improve user experience (abstract) | Add skeleton screens, confirmation dialogs for critical actions, real-time form validation hints (actionable) |
Rework and delays on many projects trace back to these same root causes: misunderstanding requirements leads to building the wrong thing, unclear boundaries cause scope creep, and insufficient exploration of technical options leads to wrong architectural choices. SDD’s clarification mode pushes these problems upstream, solving them before any code gets written.
Both tools ship clarification, but they place it differently. spec-kit makes it a formal step inside the workflow, aimed at patching holes in the spec. OpenSpec makes it an open-ended phase before the workflow, aimed at deciding whether and what to build.
spec-kit’s clarify: Patching the Spec
/speckit.clarify must run after /speckit.specify, because what it reads is the spec.md that was just generated. It starts by scanning the spec against a fixed taxonomy covering functional scope, data model, interaction flow, non-functional targets, external dependencies, edge cases, and terminology consistency, marking each area as clear, partial, or missing, then ranking questions by impact and uncertainty.
The questioning phase has three hard rules: one question at a time, five at most for the whole session, and each question either offers two to five mutually exclusive options or demands an answer of five words or fewer. Each option set carries a recommended pick with a one-line reason, and replying yes accepts it.
1 | You: /speckit.clarify |
Answers never land in a separate clarification file. They are written back into spec.md: terminology answers normalize wording throughout, data answers extend the data model, and vague adjectives become measurable targets. Each answer is saved immediately, so an interrupted session loses nothing. When the run ends, spec.md carries a ## Clarifications section recording the questions and answers, and the affected sections have already been rewritten in place, so a reader never has to jump between files.
If dimensions remain unresolved after five questions, the report marks them Deferred and hands them to /speckit.plan. The cap is deliberate: clarification exists to stop the work drifting in the wrong direction, not to lock down every detail before design starts.
OpenSpec’s explore: Thinking Before Building
/opsx:explore produces no formal specification; it opens a free-form conversation. You can have it read the code to establish the current state, list competing approaches, or sketch a data model. Once the picture is clear you decide whether to open a change at all, and how many, without being forced to scaffold documents for a question that isn’t settled yet.
1 | You: /opsx:explore "Users complain search is too slow, want to optimize" |
Installation
Installing spec-kit
1 | # Option 1: Install stable release (v0.6.1) |
Initialize a project:
1 | # Create new project |
Installing OpenSpec
1 | # Requires Node.js 20.19.0+ |
Hands-On: Adding Dark Mode to a Blog
The same requirement plays out very differently on the two tools. spec-kit splits it into nine commands, each producing one or two documents, with a checkpoint at every step. OpenSpec lists more commands, but only four or five form the main path, and the documents in between are generated back to back. Here is the dark mode requirement run through both.
spec-kit’s Nine Commands
The list first, and note that not every command is required.
| Command | Purpose | When to Use | Output |
|---|---|---|---|
/speckit.constitution |
Define the project constitution: stack, conventions, testing rules | Once per project | .specify/memory/constitution.md |
/speckit.specify |
Turn a paragraph into a feature spec | Once per feature | specs/001-xxx/spec.md |
/speckit.clarify |
Find gaps in the spec and ask about them | After the spec exists | Answers written back into spec.md |
/speckit.checklist |
Generate requirement quality checklists | For complex requirements | checklists/*.md |
/speckit.plan |
Settle the technical approach and do the research | After the spec is confirmed | plan.md, research.md, data-model.md, contracts/ |
/speckit.tasks |
Break work into dependency-ordered tasks | After the plan is confirmed | tasks.md |
/speckit.analyze |
Read-only consistency check across the three documents | Before implementation | A report; no files change |
/speckit.implement |
Execute tasks and write code | After the check passes | Code, tasks ticked off |
/speckit.taskstoissues |
Convert tasks into GitHub issues | For team work | A batch of issues |
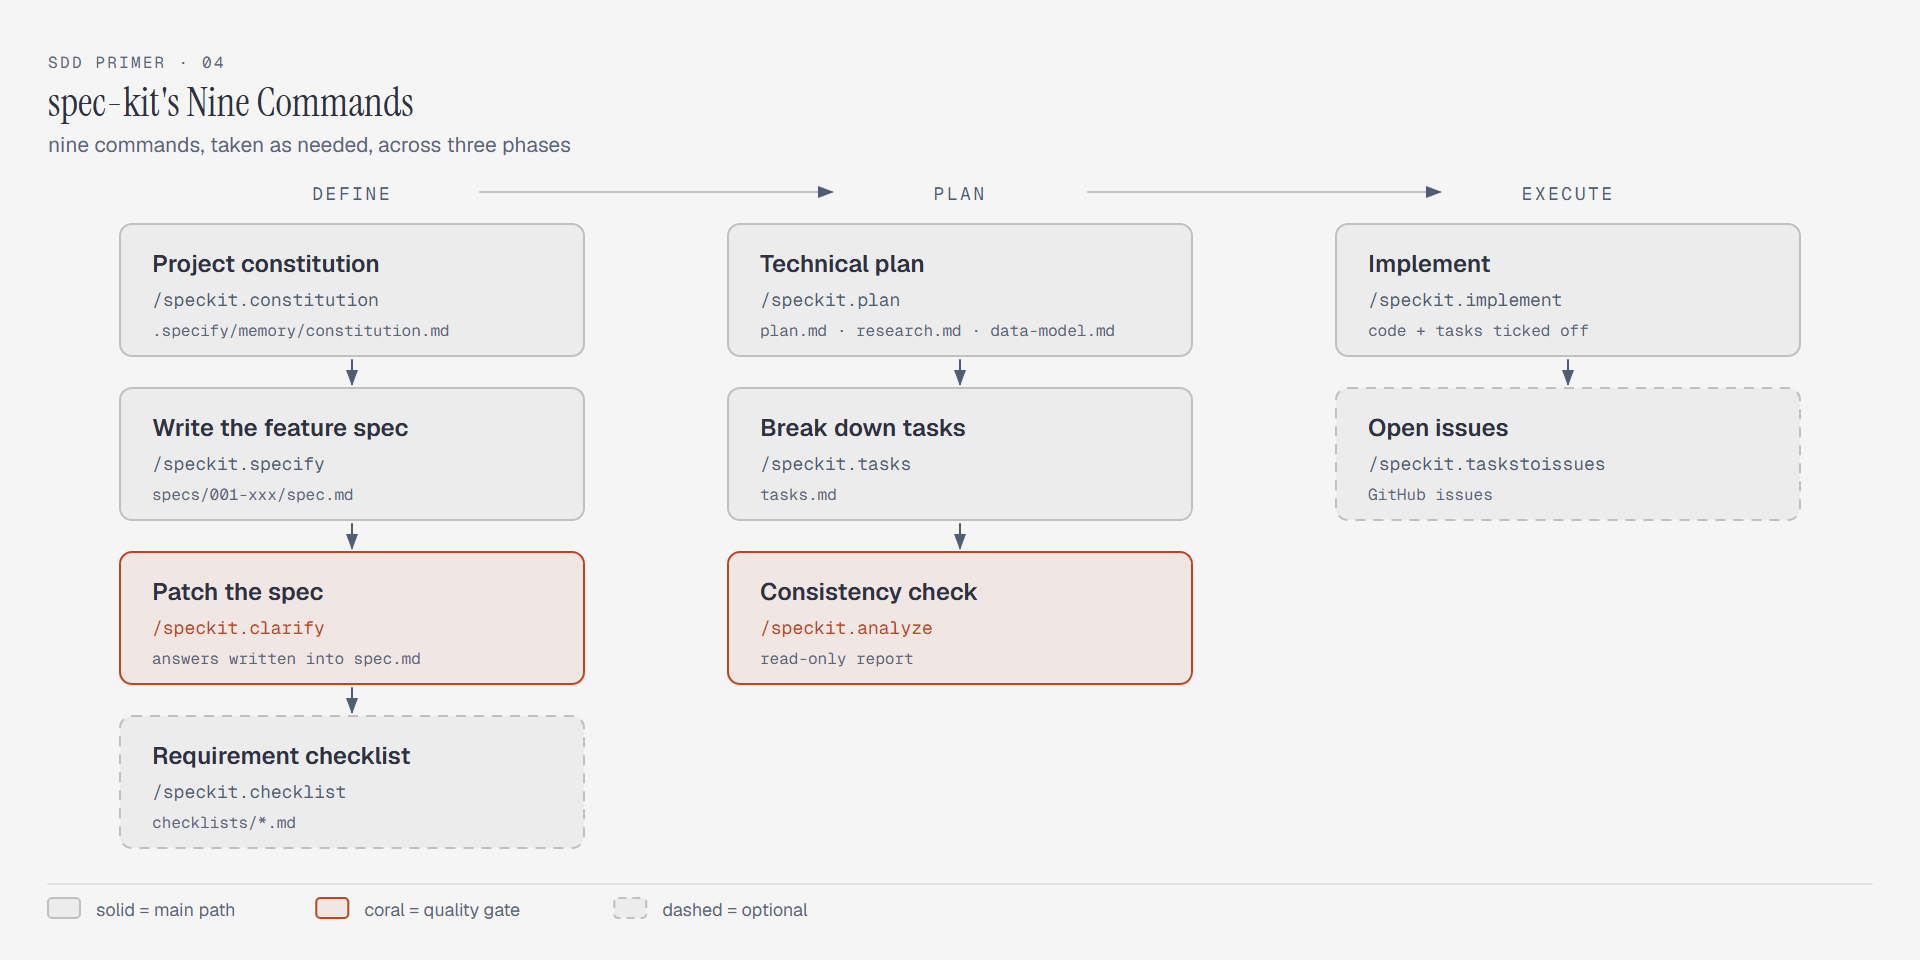
Step one, set the ground rules. Run /speckit.constitution and spell out the stack, code style, test coverage target, and documentation requirements. The content goes into .specify/memory/constitution.md and is read as a constraint every time a plan or task list is generated; the plan also carries a Constitution Check section that walks through it point by point. One run per project is enough, and you re-run it when the rules change.
Step two, write the spec. Run /speckit.specify with the requirement:
1 | You: /speckit.specify Add dark mode to the blog, supporting light, dark, and |
Describe only what, never how. Names like React Context or CSS variables have no place in spec.md; they belong to the plan step. Letting them in early locks the implementation before the options have been weighed and hollows out the spec.
Step three, clarify. Run /speckit.clarify, and AI scans for gaps and asks about them one at a time, as covered in the previous section. Dark mode typically triggers questions about whether system-follow survives a manual override, how to prevent a flash of the wrong theme on first paint, and what to do with third-party components that never adapted.
Step four, technical plan. Run /speckit.plan. AI writes plan.md, does the research and records conclusions in research.md, and models the entities in data-model.md. plan.md covers the technical choice (CSS variables or styled-components), the list of files to touch, and the phases of implementation.
Step five, break down tasks. Run /speckit.tasks, and the resulting list looks roughly like this:
1 | ## Tasks |
Step six, consistency check. Run /speckit.analyze. It only reads, and looks for three kinds of problems: requirements present in the spec but missing from the task list, implementation details in the plan that never appeared in the spec, and the same concept named two different ways across documents. Tasks derive from the plan and the plan derives from the spec, so details get dropped along the chain, and this step picks them back up.
Step seven, implement. Run /speckit.implement. AI works through the task list, flipping - [ ] to - [x] as it goes, and stops to ask when it hits a blocker. No feature name argument is needed; the command works off the current branch.
To push the work into GitHub, finish with /speckit.taskstoissues, which opens issues in dependency order and saves coordination overhead when several people split the work.
OpenSpec’s Ten Commands
OpenSpec has more commands, but each one does less.
| Command | Purpose | When to Use | Output |
|---|---|---|---|
/opsx:onboard |
Walk through a full cycle on your real project | First contact | Nothing; guided narration |
/opsx:explore |
Talk only, no artifacts, to settle a vague requirement | When the requirement is unclear | Conclusions, optionally saved |
/opsx:new |
Create a change directory, then produce one artifact at a time | The default start | changes/<name>/ skeleton |
/opsx:continue |
Create the next artifact that is ready | When you want checkpoints | Four artifacts, in order |
/opsx:ff |
Generate all remaining artifacts in one pass | When time is short | The same artifacts, generated at once |
/opsx:propose |
One description in, a complete implementable set out | When the requirement is settled | The full set |
/opsx:apply |
Work through tasks.md, ticking as you go | When coding starts | Code, tasks ticked off |
/opsx:verify |
Check the implementation against specs and tasks | After implementation | A three-dimension report |
/opsx:sync |
Merge the delta specs into the main specs without archiving | When main specs should update first | Updated openspec/specs/ |
/opsx:archive |
Archive the change and sync the main specs | When the work is done | Moved into changes/archive/ |
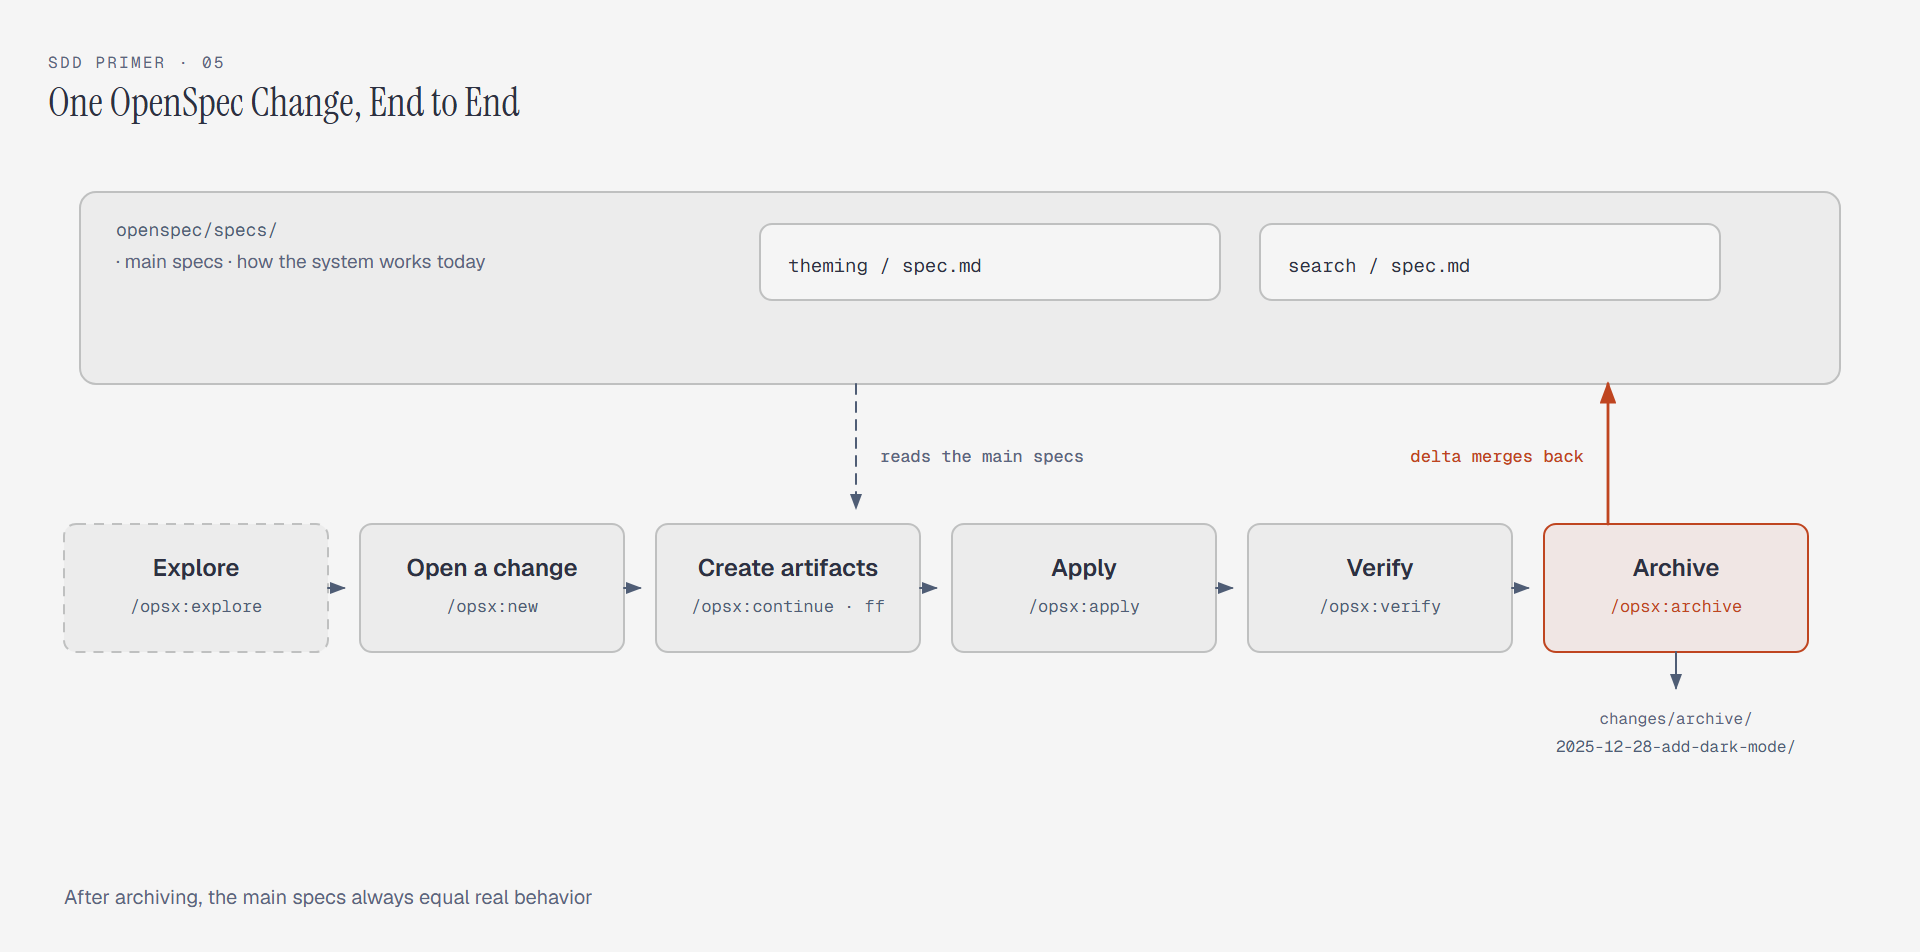
new, continue, ff, and propose are the four that get confused. The relationship: new only creates the directory, continue produces one artifact per run, ff generates everything remaining at once, and propose goes from a single description to an implementable state. Use new plus continue when you want to review each artifact, and propose when you don’t.
Step one, initialize. After openspec init, the project gains an openspec/ directory and a set of /opsx:* commands. config.yaml carries the stack description and any extra rules per artifact, and AI reads it whenever it generates a document.
Step two, decide whether to explore. If the requirement is vague, start with /opsx:explore; if it’s settled, skip ahead. Dark mode rarely needs exploration.
Step three, open a change. Run /opsx:new add-dark-mode, and AI scaffolds the directory and points you at the proposal. Each subsequent /opsx:continue produces one artifact, in the order the configured workflow defines: proposal first, then specs and design, then tasks. Tasks depend on the first two, so the order cannot be rearranged.
The proposal covers why the change exists, which capabilities it touches, and what code it affects. Specs add a delta file per capability. Design is written only when the change involves architecture, an external dependency, or a real data model change; a small tweak can skip it.
Step four, review the spec. Open changes/add-dark-mode/specs/theming/spec.md and add a requirement under ## MODIFIED Requirements: the toggle should display the current mode icon. Editing the file directly is enough, and AI reads the edited version on its next pass.
Step five, implement. Run /opsx:apply, and AI works through the task list, ticking each item off:
1 | AI: Implementing tasks... |
Step six, verify. Run /opsx:verify. It checks three dimensions: whether every task is complete, whether every requirement in the specs has a matching implementation, and whether the documents and the code contradict each other. The result is a report that points at specific files and lines.
Step seven, archive. Run /opsx:archive, and the change directory moves to changes/archive/2025-12-28-add-dark-mode/ while the delta merges into openspec/specs/theming/spec.md. It lists the adds, edits, and removals for confirmation first, and if the main spec has been changed elsewhere it diffs them before deciding how to merge.
Running the same change through both tools makes the difference obvious. spec-kit has you stop and look at every step, at the cost of more commands and more documents. OpenSpec has you focus on the proposal and the specs, at the cost of an opaque middle: you have to open files afterwards to see what AI actually wrote.
Choosing Between spec-kit and OpenSpec
| Dimension | spec-kit | OpenSpec |
|---|---|---|
| Creator | GitHub (official) | Fission AI (startup) |
| Style | Engineering-focused, rigorous | Flexible, fast |
| Installation | Python + uv | Node.js + npm |
| Workflow | Step-by-step, nine commands used as needed | Four or five actions on the main path, documents generated back to back |
| Extensibility | 40+ official extensions | Configuration-based customization |
| Best For | Large projects, team collaboration | Personal projects, rapid iteration |
| Learning Curve | Steeper (more concepts) | Flatter (quick to pick up) |
My recommendation: go with spec-kit for large teams or Python projects, and OpenSpec for individual developers or TypeScript projects. If you want to quickly experience the SDD workflow, try OpenSpec first, then learn spec-kit systematically.
SDD’s core value is moving the quality gate upstream to the specification stage. When AI can generate code from specifications, spec quality directly determines code quality. Rather than reworking repeatedly during implementation, invest time in clarifying requirements before writing any code.
References
- GitHub spec-kit — 87k+ Stars
- Fission-AI OpenSpec — 39k+ Stars
- The Rise of SDD in the AI Era
- SDD Complete Guide